A few weeks ago I stumbled across the idea of a “Cheap Yellow Display” (CYD) which is an ESP32 development board with a small resistive touchscreen attached. As the name suggests, it’s cheap (usually $15–$20), and since it’s built around the ESP32, it immediately caught my attention. I’ve used ESP32 boards in several projects, and ESPHome has been treating me well lately, so this felt like a perfect little side experiment.
I didn’t have a specific use case in mind. At this price point, the goal was simply to get familiar with the hardware, learn how to drive the display and touchscreen, and eventually build toward something that integrates with Home Assistant.
Materials
The only thing I purchased was the CYD itself (a fully integrated ESP32 board with a 2.8″ resistive touchscreen). These come from various sellers with different USB connectors; I picked one with USB‑C.
- 2.8” ESP32 Display Resistive Touch Screen – from Amazon
Preparing the CYD
The screen arrived in a small plastic case along with a stylus, a USB cable, and a 4-pin connector. When I powered it on for the first time, it booted into a preloaded demo application showcasing various UI elements such as buttons, selectors, charts, and lists. It actually reminded me of those Bootstrap-style demo pages you sometimes see in UI kits.
One detail I thought was particularly neat was the built-in frame rate counter. You could watch the FPS dip as more complex elements appeared on screen. That’s not surprising for a small microcontroller, but it was still interesting to see. The touchscreen also isn’t nearly as responsive as a modern smartphone, although that’s to be expected since it uses a resistive touchscreen rather than a capacitive one.
Here’s a quick video showing the demo.
The demo was fun to play with, but I couldn’t really picture that style of interface being practical on such a small display. Besides, I wasn’t interested in keeping the demo, I wanted to get ESPHome running on it.
While looking for a starting point, I came across an excellent post on the Decryption Blog, which pointed me to witnessmenow’s GitHub repository full of ESPHome examples for the CYD. Between those two resources, I had everything I needed to get started.
Installing ESP Home
I started the setup much the same way as my previous ESPHome projects. For the initial flash, I used the ESPHome Web Flasher. The only quirk was needing to hold the BOOT button until flashing began so that the board would enter programming mode.
Once that was complete, I switched over to “ESPHome Device Builder” in Home Assistant and took control of the device. This compiled and flashed the initial firmware, giving me a clean starting point to build from.
While the firmware was compiling, I also created a DHCP reservation on my router so the device would always receive the same IP address. (If you’re unfamiliar with the initial ESPHome setup process, I’ve covered it in more detail in a previous post.)
Here is the base config I started with
esphome:
  name: esp-cyd-screen
  friendly_name: CYD Screen
  min_version: 2026.4.0
  name_add_mac_suffix: false

esp32:
  board: esp32dev
  framework:
    type: arduino

# Enable logging
logger:

# Enable Home Assistant API
api:
  encryption:
    key: !secret api_key

# Allow Over-The-Air updates
ota:
  platform: esphome
  password: !secret ota_password

wifi:
  ssid: !secret wifi_ssid
  password: !secret wifi_password
  manual_ip:
    static_ip: 192.168.1.229
    gateway: 192.168.1.1
    subnet: 255.255.255.0
  ap:
    password: !secret ap_password

binary_sensor:
 - platform: status
   name: "Status"

sensor:
  - platform: wifi_signal
    name: "WiFi Signal Sensor"
  - platform: uptime
    type: seconds
    name: Uptime Sensor

text_sensor:
  - platform: wifi_info
    ssid:
      name: ESP Connected SSID
    mac_address:
      name: ESP Mac Wifi Address
  - platform: version
    name: "ESPHome Version"
    hide_timestamp: true
I won’t go into detail on each of these settings since they’re largely the same as the configuration I’ve used in previous ESPHome projects. The Wi-Fi, OTA updates, logging, API access, and diagnostic sensors all serve the same purpose here. (I’ve described these sensors in more detail in a previous post)
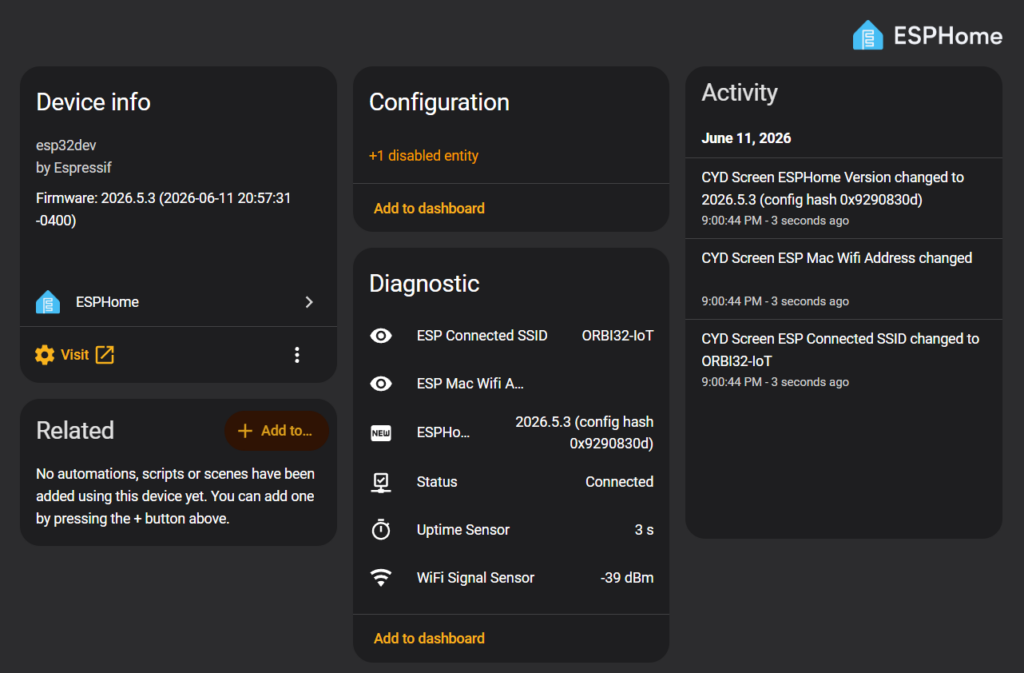
Once the device came online, I added it to Home Assistant and confirmed that all of the sensors were reporting correctly. (more details on the process here).
Using the Display
With the basics out of the way, it was finally time to make the screen earn its keep. Up to this point, the device was connected to Home Assistant and happily reporting sensors, but the display itself was still blank.
Showing the test image
The first step was simply getting something to appear on the screen. Following the Decryption Blog post I mentioned earlier, I started by configuring the display’s backlight.
output:
  - platform: ledc
    pin: GPIO21
    id: backlight_pwm

light:
  - platform: monochromatic
    output: backlight_pwm
    name: Display Backlight
    id: backlight
    restore_mode: ALWAYS_ON
This exposes the backlight as a light entity in Home Assistant while also ensuring the screen is actually visible. Having it exposed as an entity opens up some interesting possibilities for automation later on (for example, automatically dimming or turning off the display after a period of inactivity).
Next came the SPI configuration. The display communicates over SPI, so ESPHome needs to know which pins are connected to the controller.
spi:
  - id: tft
    clk_pin: GPIO14
    mosi_pin: GPIO13
    miso_pin: GPIO12
Once SPI was in place, all that remained was defining the display itself. ESPHome includes built-in support for the ILI9341 controller used by the CYD.
display:
  - platform: ili9xxx
    model: ILI9341
    spi_id: tft
    cs_pin: GPIO15
    dc_pin: GPIO2
    invert_colors: false
    color_palette: 8BIT
    auto_clear_enabled: true
    show_test_card: true
A few of these settings are worth calling out:
invert_colorsdetermines whether the display colors should be inverted (required)color_paletteswitches the display to an 8-bit color palette. This reduces memory usage compared to the default 16-bit mode, which is a better fit for the ESP32’s limited RAM.auto_clear_enabledclears the display before each redraw. I’m honestly not sure it’s required for this simple example, but it doesn’t hurt to leave enabled.show_test_cardtells ESPHome to render a built-in test pattern instead of a custom interface.
Putting everything together, the configuration now looked like this
esphome:
  name: esp-cyd-screen
  friendly_name: CYD Screen
  min_version: 2026.4.0
  name_add_mac_suffix: false

esp32:
  board: esp32dev
  framework:
    type: arduino

# Enable logging
logger:

# Enable Home Assistant API
api:
  encryption:
    key: !secret api_key

# Allow Over-The-Air updates
ota:
  platform: esphome
  password: !secret ota_password

wifi:
  ssid: !secret wifi_ssid
  password: !secret wifi_password
  manual_ip:
    static_ip: 192.168.1.229
    gateway: 192.168.1.1
    subnet: 255.255.255.0
  ap:
    password: !secret ap_password

binary_sensor:
 - platform: status
   name: "Status"

sensor:
  - platform: wifi_signal
    name: "WiFi Signal Sensor"
  - platform: uptime
    type: seconds
    name: Uptime Sensor

text_sensor:
  - platform: wifi_info
    ssid:
      name: ESP Connected SSID
    mac_address:
      name: ESP Mac Wifi Address
  - platform: version
    name: "ESPHome Version"
    hide_timestamp: true

output:
  - platform: ledc
    pin: GPIO21
    id: backlight_pwm

light:
  - platform: monochromatic
    output: backlight_pwm
    name: Display Backlight
    id: backlight
    restore_mode: ALWAYS_ON

spi:
  - id: tft
    clk_pin: GPIO14
    mosi_pin: GPIO13
    miso_pin: GPIO12

display:
  - platform: ili9xxx
    model: ILI9341
    spi_id: tft
    cs_pin: GPIO15
    dc_pin: GPIO2
    invert_colors: false
    color_palette: 8BIT
    auto_clear_enabled: true
    show_test_card: true
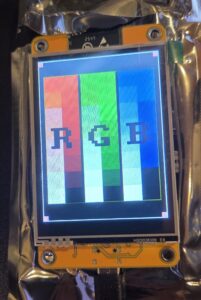
After compiling and flashing the updated configuration, the display sprang to life with ESPHome’s built-in test card. It wasn’t exciting visually, but it confirmed that the ESP32 was communicating correctly with the display, which was exactly what I wanted before moving on.
Hello World Example
The test card proved that the hardware was working, but I wanted to render something of my own. One of the examples from witnessmenow’s repository was a simple “Hello World” application, which made for a perfect next step. Besides displaying some text, it also introduced custom fonts, colors, and ESPHome’s display lambda, which is where the real flexibility comes from.
I started with the configuration I had from the previous example and added on to it. The first thing I needed was a font. The example used a local TrueType font, so I downloaded it and copied it into my Home Assistant configuration. (I later discovered ESPHome can also download fonts directly from Google Fonts, which we’ll use later). I also defined a color matching Home Assistant’s blue.
# Create a font to use, add and remove glyphs as needed.
font:
  - file: 'fonts/Arimo-Regular.ttf'
    id: arimo20
    size: 20
    glyphs: "!\"%()+=,-_.:°0123456789ABCDEFGHIJKLMNOPQRSTUVWXYZÅÄÖ abcdefghijklmnopqrstuvwxyzåäö"

# Create a Home Assistant blue color
color:
  - id: ha_blue
    hex: 51c0f2
From there, I updated the display configuration with a lambda. This is where ESPHome lets you embed small snippets of C++ to draw directly on the display.
display:
  - platform: ili9xxx
    model: ILI9341
    spi_id: tft
    cs_pin: GPIO15
    dc_pin: GPIO2
    rotation: 90
    invert_colors: false
    color_palette: 8BIT
    lambda: |-
      it.print(160, 140, id(arimo20), id(ha_blue), TextAlign::BOTTOM_CENTER, "Hello World!");
      it.rectangle(0, 0, 320, 240, id(ha_blue));
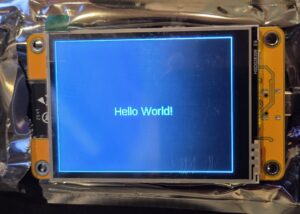
This example draws a blue rectangle and prints “Hello World!” centered on the screen. While it’s still a simple demo, it demonstrates the basic building blocks for creating a custom interface: drawing shapes, selecting fonts, choosing colors, and rendering text wherever you want it.
With those additions in place, the complete configuration looked like this:
esphome:
  name: esp-cyd-screen
  friendly_name: CYD Screen
  min_version: 2026.4.0
  name_add_mac_suffix: false

esp32:
  board: esp32dev
  framework:
    type: arduino

# Enable logging
logger:

# Enable Home Assistant API
api:
  encryption:
    key: !secret api_key

# Allow Over-The-Air updates
ota:
  platform: esphome
  password: !secret ota_password

wifi:
  ssid: !secret wifi_ssid
  password: !secret wifi_password
  manual_ip:
    static_ip: 192.168.1.229
    gateway: 192.168.1.1
    subnet: 255.255.255.0
  ap:
    password: !secret ap_password

binary_sensor:
 - platform: status
   name: "Status"

sensor:
  - platform: wifi_signal
    name: "WiFi Signal Sensor"
  - platform: uptime
    type: seconds
    name: Uptime Sensor

text_sensor:
  - platform: wifi_info
    ssid:
      name: ESP Connected SSID
    mac_address:
      name: ESP Mac Wifi Address
  - platform: version
    name: "ESPHome Version"
    hide_timestamp: true

output:
  - platform: ledc
    pin: GPIO21
    id: backlight_pwm

light:
  - platform: monochromatic
    output: backlight_pwm
    name: Display Backlight
    id: backlight
    restore_mode: ALWAYS_ON

spi:
  - id: tft
    clk_pin: GPIO14
    mosi_pin: GPIO13
    miso_pin: GPIO12

# Create a font to use, add and remove glyphs as needed.
font:
  - file: 'fonts/Arimo-Regular.ttf'
    id: arimo20
    size: 20
    glyphs: "!\"%()+=,-_.:°0123456789ABCDEFGHIJKLMNOPQRSTUVWXYZÅÄÖ abcdefghijklmnopqrstuvwxyzåäö"

# Create a Home Assistant blue color
color:
  - id: ha_blue
    hex: 51c0f2

display:
  - platform: ili9xxx
    model: ILI9341
    spi_id: tft
    cs_pin: GPIO15
    dc_pin: GPIO2
    rotation: 90
    invert_colors: false
    color_palette: 8BIT
    lambda: |-
      it.print(160, 140, id(arimo20), id(ha_blue), TextAlign::BOTTOM_CENTER, "Hello World!");
      it.rectangle(0, 0, 320, 240, id(ha_blue));
After another compile and flash, I was greeted by my very own “Hello World” screen. It wasn’t much, but it marked the point where I stopped displaying ESPHome’s built-in examples and started controlling exactly what appeared on the display.
Using the Touchscreen
With the display working, the next obvious step was getting the touchscreen functional. Up to this point, everything had been one-way: the ESP32 could draw to the screen, but there was no way to interact with it yet.
That’s when I went back to the Decryption Blog post and realized the next step was going to be a bit more involved than I expected.
Calibrating the Touchscreen
This was the first part of the project that felt like real embedded debugging. The CYD uses an XPT2046 touch controller, which requires calibration before touch input becomes accurate. The calibration process is a little tedious, but you only need to do it once per screen.
The general process looks like this:
- Flash a test configuration that prints raw touch coordinates
- Tap each corner of the screen with a stylus
- Record the raw values
- Use those values to define calibration bounds
Luckily, the blog post I was following laid this out clearly enough that I didn’t have to reverse-engineer it.
There are a few pieces of config I had to add to interface with the touchscreen. First the SPI definition of how the controller should talk to the touchscreen (in addition to what I already had):
spi:
  - id: touch
    clk_pin: GPIO25
    mosi_pin: GPIO32
    miso_pin: GPIO39
then I added a touchscreen configuration that simply logged touch coordinates
touchscreen:
  platform: xpt2046
  id: my_touchscreen
  spi_id: touch
  cs_pin: GPIO33
  interrupt_pin: GPIO36
  calibration:
    x_min: 0
    x_max: 280
    y_min: 340
    y_max: 3860
  transform:
    swap_xy: true
  on_touch:
  - lambda: |-
      ESP_LOGI("cal", "x=%d, y=%d, x_raw=%d, y_raw=%d",
          touch.x,
          touch.y,
          touch.x_raw,
          touch.y_raw
      );
Here is the full calibration config
esphome:
  name: esp-cyd-screen
  friendly_name: CYD Screen
  min_version: 2026.4.0
  name_add_mac_suffix: false

esp32:
  board: esp32dev
  framework:
    type: arduino

# Enable logging
logger:

# Enable Home Assistant API
api:
  encryption:
    key: !secret api_key

# Allow Over-The-Air updates
ota:
  platform: esphome
  password: !secret ota_password

wifi:
  ssid: !secret wifi_ssid
  password: !secret wifi_password
  manual_ip:
    static_ip: 192.168.1.229
    gateway: 192.168.1.1
    subnet: 255.255.255.0
  ap:
    password: !secret ap_password

binary_sensor:
 - platform: status
   name: "Status"

sensor:
  - platform: wifi_signal
    name: "WiFi Signal Sensor"
  - platform: uptime
    type: seconds
    name: Uptime Sensor

text_sensor:
  - platform: wifi_info
    ssid:
      name: ESP Connected SSID
    mac_address:
      name: ESP Mac Wifi Address
  - platform: version
    name: "ESPHome Version"
    hide_timestamp: true

output:
  - platform: ledc
    pin: GPIO21
    id: backlight_pwm

light:
  - platform: monochromatic
    output: backlight_pwm
    name: Display Backlight
    id: backlight
    restore_mode: ALWAYS_ON

spi:
  - id: tft
    clk_pin: GPIO14
    mosi_pin: GPIO13
    miso_pin: GPIO12
  - id: touch
    clk_pin: GPIO25
    mosi_pin: GPIO32
    miso_pin: GPIO39

display:
  - platform: ili9xxx
    model: ILI9341
    spi_id: tft
    cs_pin: GPIO15
    dc_pin: GPIO2
    invert_colors: false
    color_palette: 8BIT
    auto_clear_enabled: true
    show_test_card: true

touchscreen:
  platform: xpt2046
  id: my_touchscreen
  spi_id: touch
  cs_pin: GPIO33
  interrupt_pin: GPIO36
  calibration:
    x_min: 0
    x_max: 280
    y_min: 340
    y_max: 3860
  transform:
    swap_xy: true
  on_touch:
  - lambda: |-
      ESP_LOGI("cal", "x=%d, y=%d, x_raw=%d, y_raw=%d",
          touch.x,
          touch.y,
          touch.x_raw,
          touch.y_raw
      );
With this flashed, every tap on the screen printed both calibrated and raw coordinates to the logs. Using the included stylus, I carefully tapped each corner and recorded the values.
The results looked something like this (your exact values will vary per unit):
[23:34:52.936][I][cal:107]: x=165, y=0, x_raw=193, y_raw=261
[23:35:11.883][I][cal:107]: x=133, y=318, x_raw=156, y_raw=3845
[23:35:26.152][I][cal:107]: x=239, y=317, x_raw=3759, y_raw=3839
[23:35:39.323][I][cal:107]: x=239, y=0, x_raw=3773, y_raw=240
Once I had those values, I looked at the raw x and y values and mapped them into the calibration block
calibration:
  x_min: 156
  x_max: 3773
  y_min: 240
  y_max: 3845
Hello World with Touch
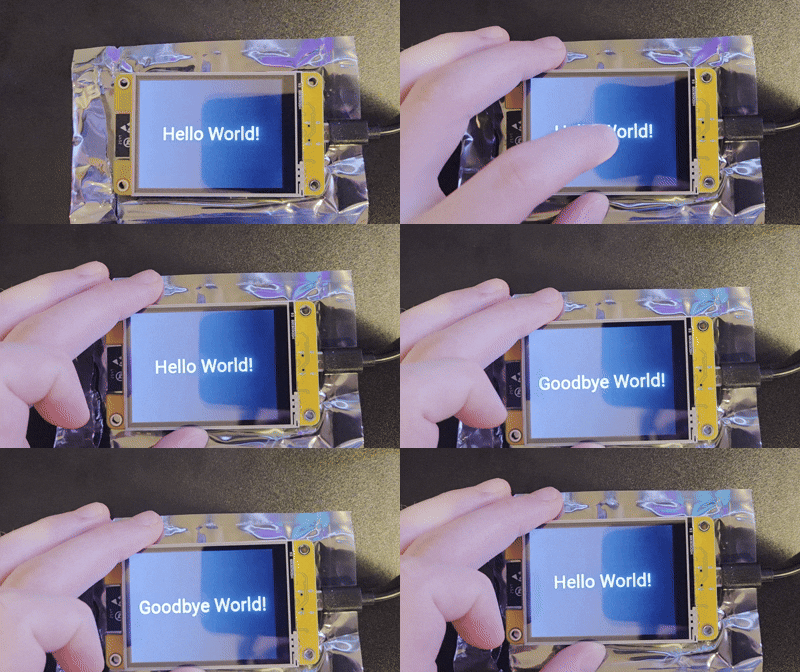
With calibration working, the next step was to make the touchscreen actually do something. The post I was following had a simple example that toggles between two messages: “Hello World!” and “Goodbye World!” each time the screen is touched.
Similar to before, I needed a couple of supporting pieces: a font and a color definition. For this example, I used a font from Google Fonts instead of a locally sourced font
font:
  - file:
      type: gfonts
      family: Roboto
    id: roboto_large
    size: 40
    bpp: 4

color:
  - id: ha_blue
    hex: 51c0f2
Then I introduced a global variable to keep track of state. ESPHome globals are a simple but powerful way to store small bits of runtime state across updates (docs).
globals:
  - id: display_hello
    type: bool
    initial_value: 'true'
Now the interesting part: the display lambda. Instead of static text, the screen now renders different content based on that global state.
display:
  - platform: ili9xxx
    model: ILI9341
    spi_id: tft
    cs_pin: GPIO15
    dc_pin: GPIO2
    invert_colors: false
    color_palette: 8BIT
    rotation: 90
    auto_clear_enabled: true
    lambda: |-
      auto font = id(roboto_large);
      const char* text;

      if (id(display_hello)) {
        text = "Hello World!";
      } else {
        text = "Goodbye World!";
      }

      int x1, y1, text_width, text_height;

      it.get_text_bounds(0, 0, text, font, TextAlign::TOP_LEFT, &x1, &y1, &text_width, &text_height);

      int x = (it.get_width() - text_width) / 2;
      int y = (it.get_height() - text_height) / 2;

      it.print(x, y, font, id(ha_blue), TextAlign::TOP_LEFT, text);
Finally, I wired up the touchscreen event to flip that state every time the screen is touched:
touchscreen:
  platform: xpt2046
  id: my_touchscreen
  spi_id: touch
  cs_pin: GPIO33
  interrupt_pin: GPIO36
  update_interval: 50ms
  threshold: 400
  calibration:
    x_min: 156
    x_max: 3773
    y_min: 240
    y_max: 3845
  transform:
    swap_xy: true
  on_touch:
  - lambda: |-
      id(display_hello) = !id(display_hello);
Here is the full config with the new pieces added
esphome:
  name: esp-cyd-screen
  friendly_name: CYD Screen
  min_version: 2026.4.0
  name_add_mac_suffix: false

esp32:
  board: esp32dev
  framework:
    type: arduino

# Enable logging
logger:

# Enable Home Assistant API
api:
  encryption:
    key: !secret api_key

# Allow Over-The-Air updates
ota:
  platform: esphome
  password: !secret ota_password

wifi:
  ssid: !secret wifi_ssid
  password: !secret wifi_password
  manual_ip:
    static_ip: 192.168.1.229
    gateway: 192.168.1.1
    subnet: 255.255.255.0
  ap:
    password: !secret ap_password

binary_sensor:
 - platform: status
   name: "Status"

sensor:
  - platform: wifi_signal
    name: "WiFi Signal Sensor"
  - platform: uptime
    type: seconds
    name: Uptime Sensor

text_sensor:
  - platform: wifi_info
    ssid:
      name: ESP Connected SSID
    mac_address:
      name: ESP Mac Wifi Address
  - platform: version
    name: "ESPHome Version"
    hide_timestamp: true

output:
  - platform: ledc
    pin: GPIO21
    id: backlight_pwm

light:
  - platform: monochromatic
    output: backlight_pwm
    name: Display Backlight
    id: backlight
    restore_mode: ALWAYS_ON

spi:
  - id: tft
    clk_pin: GPIO14
    mosi_pin: GPIO13
    miso_pin: GPIO12
  - id: touch
    clk_pin: GPIO25
    mosi_pin: GPIO32
    miso_pin: GPIO39

font:
  - file:
      type: gfonts
      family: Roboto
    id: roboto_large
    size: 40
    bpp: 4

color:
  - id: ha_blue
    hex: 51c0f2

globals:
  - id: display_hello
    type: bool
    initial_value: 'true'

display:
  - platform: ili9xxx
    model: ILI9341
    spi_id: tft
    cs_pin: GPIO15
    dc_pin: GPIO2
    invert_colors: false
    color_palette: 8BIT
    rotation: 90
    auto_clear_enabled: true
    lambda: |-
      auto font = id(roboto_large);
      const char* text;

      if (id(display_hello)) {
        text = "Hello World!";
      } else {
        text = "Goodbye World!";
      }

      int x1, y1, text_width, text_height;

      it.get_text_bounds(0, 0, text, font, TextAlign::TOP_LEFT, &x1, &y1, &text_width, &text_height);

      int x = (it.get_width() - text_width) / 2;
      int y = (it.get_height() - text_height) / 2;

      it.print(x, y, font, id(ha_blue), TextAlign::TOP_LEFT, text);

touchscreen:
  platform: xpt2046
  id: my_touchscreen
  spi_id: touch
  cs_pin: GPIO33
  interrupt_pin: GPIO36
  update_interval: 50ms
  threshold: 400
  calibration:
    x_min: 156
    x_max: 3773
    y_min: 240
    y_max: 3845
  transform:
    swap_xy: true
  on_touch:
  - lambda: |-
      id(display_hello) = !id(display_hello);
After flashing this, I had a fully interactive screen: tap to toggle between two states, with the display updating immediately .(And confirmed that it works acceptably with a finger too not just the stylus).
It’s still a very simple interaction, but this is the point where the device stops being a “display” and starts feeling like a tiny UI system.
Touchscreen to navigate pages
Once I had basic touch input working, the next thing that caught my attention was an example from witnessmenow that implemented multiple pages and switched between them using touch input.
That version used button regions on the screen, but I decided to simplify things for now and just switch pages on any touch event. At this stage I wasn’t trying to build a polished UI but just exploring what ESPHome could handle comfortably.
I reused the font from earlier and kept the same color scheme, since it already worked well visually.
font:
  - file: 'fonts/Arimo-Regular.ttf'
    id: arimo24
    size: 24
    glyphs: "<>!\"%()+=,-_.:°0123456789ABCDEFGHIJKLMNOPQRSTUVWXYZ abcdefghijklmnopqrstuvwxyz"

color:
  - id: ha_blue
    hex: 51c0f2
From there, I defined three separate pages in the display configuration. Each page is just a simple lambda that fills the screen and prints a short label indicating which page is active.
display:
  - platform: ili9xxx
    id: esp_display
    model: ILI9341
    spi_id: tft
    cs_pin: GPIO15
    dc_pin: GPIO2
    invert_colors: false
    color_palette: 8BIT
    rotation: 90
    auto_clear_enabled: true
    pages:
      - id: page1
        lambda: |-
          it.fill(id(ha_blue));
          it.print(0, 10, id(arimo24), "This is the first page!");
      - id: page2
        lambda: |-
          it.fill(id(ha_blue));
          it.print(0, 10, id(arimo24), "This is the second page!");
      - id: page3
        lambda: |-
          it.fill(id(ha_blue));
          it.print(0, 10, id(arimo24), "This is the third page!");
Finally, I wired the touchscreen so that any touch cycles to the next page.
touchscreen:
  platform: xpt2046
  id: my_touchscreen
  spi_id: touch
  cs_pin: GPIO33
  interrupt_pin: GPIO36
  update_interval: 50ms
  threshold: 400
  calibration:
    x_min: 156
    x_max: 3773
    y_min: 240
    y_max: 3845
  transform:
    swap_xy: true
  on_touch:
    then:
      - display.page.show_next: esp_display
here is the full config
esphome:
  name: esp-cyd-screen
  friendly_name: CYD Screen
  min_version: 2026.4.0
  name_add_mac_suffix: false

esp32:
  board: esp32dev
  framework:
    type: arduino

# Enable logging
logger:

# Enable Home Assistant API
api:
  encryption:
    key: !secret api_key

# Allow Over-The-Air updates
ota:
  platform: esphome
  password: !secret ota_password

wifi:
  ssid: !secret wifi_ssid
  password: !secret wifi_password
  manual_ip:
    static_ip: 192.168.1.229
    gateway: 192.168.1.1
    subnet: 255.255.255.0
  ap:
    password: !secret ap_password

binary_sensor:
 - platform: status
   name: "Status"

sensor:
  - platform: wifi_signal
    name: "WiFi Signal Sensor"
  - platform: uptime
    type: seconds
    name: Uptime Sensor

text_sensor:
  - platform: wifi_info
    ssid:
      name: ESP Connected SSID
    mac_address:
      name: ESP Mac Wifi Address
  - platform: version
    name: "ESPHome Version"
    hide_timestamp: true

output:
  - platform: ledc
    pin: GPIO21
    id: backlight_pwm

light:
  - platform: monochromatic
    output: backlight_pwm
    name: Display Backlight
    id: backlight
    restore_mode: ALWAYS_ON

spi:
  - id: tft
    clk_pin: GPIO14
    mosi_pin: GPIO13
    miso_pin: GPIO12
  - id: touch
    clk_pin: GPIO25
    mosi_pin: GPIO32
    miso_pin: GPIO39

font:
  - file: 'fonts/Arimo-Regular.ttf'
    id: arimo24
    size: 24
    glyphs: "<>!\"%()+=,-_.:°0123456789ABCDEFGHIJKLMNOPQRSTUVWXYZ abcdefghijklmnopqrstuvwxyz"

color:
  - id: ha_blue
    hex: 51c0f2

display:
  - platform: ili9xxx
    id: esp_display
    model: ILI9341
    spi_id: tft
    cs_pin: GPIO15
    dc_pin: GPIO2
    invert_colors: false
    color_palette: 8BIT
    rotation: 90
    auto_clear_enabled: true
    pages:
      - id: page1
        lambda: |-
          it.fill(id(ha_blue));
          it.print(0, 10, id(arimo24), "This is the first page!");
      - id: page2
        lambda: |-
          it.fill(id(ha_blue));
          it.print(0, 10, id(arimo24), "This is the second page!");
      - id: page3
        lambda: |-
          it.fill(id(ha_blue));
          it.print(0, 10, id(arimo24), "This is the third page!");

touchscreen:
  platform: xpt2046
  id: my_touchscreen
  spi_id: touch
  cs_pin: GPIO33
  interrupt_pin: GPIO36
  update_interval: 50ms
  threshold: 400
  calibration:
    x_min: 156
    x_max: 3773
    y_min: 240
    y_max: 3845
  transform:
    swap_xy: true
  on_touch:
    then:
      - display.page.show_next: esp_display
After flashing the updated configuration, I could cycle through all three pages just by tapping the screen.
It’s a simple interaction, but it changes the feel of the device quite a bit. Instead of a single static screen or a single toggle, it starts to resemble a very minimal UI framework—something closer to a menu system.
One thing that stood out here is how clean ESPHome makes this pattern. Once the pages are defined, switching between them is essentially a single action.
I also noticed that the Google Fonts version of Roboto (used earlier in the project) looked noticeably sharper compared to the Arimo font. It’s a small detail, but it makes the UI feel a bit more modern even with minimal styling.
Conclusion
Overall, this first round of experimentation confirmed what I was hoping: ESPHome makes it surprisingly easy to build interfaces on these inexpensive displays. The examples here were intentionally simple, but they gave me a solid understanding of the display pipeline, touch input, and how ESPHome mixes YAML with small snippets of C++.
One thing that still feels slightly awkward is writing inline C++ inside YAML. It works well enough for small pieces of logic, but the lack of syntax highlighting and tooling makes it feel a bit rough compared to a traditional development environment. Even so, for this kind of embedded UI work, it’s a reasonable trade-off.
Next, I want to move beyond demos and build something genuinely useful. The goal is to create a small Home Assistant dashboard that can display sensor data and interact with devices directly from the screen. That should be a much more interesting test of what this little $15 display is capable of.